To install a light switch, turn off the power and remove the old switch. Connect the new switch using the same wiring.
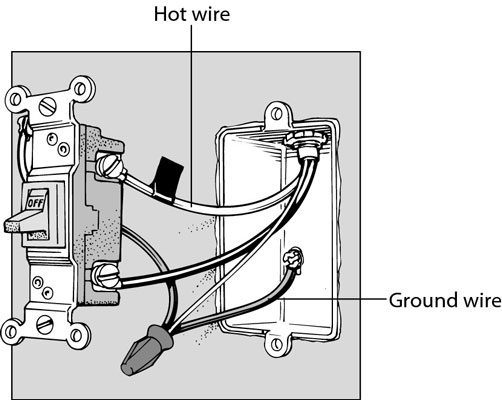
Installing a light switch is a straightforward task that enhances your home’s functionality. First, ensure safety by switching off the power at the circuit breaker. After removing the old switch, identify and connect the wires to the new switch. Typically, you’ll have a ground wire, a hot wire, and a neutral wire.
Secure the connections and mount the switch back into the wall box. Finally, restore power and test the switch to ensure it operates correctly. This process not only upgrades your home but also offers a sense of accomplishment.
Credit: www.hometips.com
Tools And Materials
Installing a light switch is a straightforward task. You need the right tools and materials to complete it safely and efficiently. This section will guide you through the essential tools and necessary materials required for the job.
Essential Tools
Having the right tools makes the job easier and safer. Below is a list of essential tools you will need:
- Flathead Screwdriver: For removing and installing screws.
- Phillips Screwdriver: For screws with a cross-shaped slot.
- Voltage Tester: To ensure no live wires are present.
- Wire Strippers: For stripping insulation from wires.
- Needle-Nose Pliers: To bend and twist wires.
- Electrical Tape: For insulating wire connections.
Necessary Materials
Gathering the right materials is crucial for a successful installation. Below is a list of necessary materials:
- Light Switch: Choose the right type for your needs.
- Switch Plate: To cover the switch for safety.
- Wire Nuts: For connecting wires securely.
- Electrical Box: If you are installing a new switch.
Below is a table summarizing the tools and materials required:
| Essential Tools | Necessary Materials |
|---|---|
| Flathead Screwdriver | Light Switch |
| Phillips Screwdriver | Switch Plate |
| Voltage Tester | Wire Nuts |
| Wire Strippers | Electrical Box |
| Needle-Nose Pliers | |
| Electrical Tape |
Safety Precautions
Installing a light switch can be easy. But safety is most important. Before you start, follow these safety precautions. Protect yourself and your home.
Turn Off Power
First, turn off the power. Go to your home’s breaker box. Find the correct breaker switch. This switch controls the light switch you want to replace. Turn it off. This ensures no power flows to the switch.
Double-check the breaker label. Make sure it matches the room. If unsure, turn off the main breaker. This cuts power to the whole house.
Verify No Electricity
Next, verify there is no electricity. Use a voltage tester. Place the tester on the light switch wires. The tester should not light up. This means the power is off.
If the tester lights up, the power is still on. Go back to the breaker box. Make sure you turned off the right breaker. Test again until the tester shows no power.
Always use a reliable voltage tester. This tool ensures your safety. Never skip this step.
Removing The Old Switch
Before installing a new light switch, you must remove the old one. This process is simple but requires attention to detail. Follow these steps to ensure safety and efficiency.
Unscrew The Cover Plate
First, turn off the power at the circuit breaker. Safety is very important. Use a screwdriver to remove the screws on the cover plate. Put the screws in a safe place. Gently pull off the cover plate. You will see the old switch and its mounting screws.
Disconnect Wires
After removing the cover plate, you need to disconnect the wires. Use a screwdriver to loosen the screws holding the wires. Carefully pull the wires off the screws. Make sure not to damage the wires. You may see different colored wires. These wires are for different purposes:
| Wire Color | Purpose |
|---|---|
| Black or Red | Hot Wire |
| White | Neutral Wire |
| Green or Bare Copper | Ground Wire |
Label the wires if needed. This helps when connecting the new switch. Once all wires are disconnected, remove the old switch from the wall box.
Now, you are ready to install the new light switch. Just follow the next steps carefully.
Preparing The New Switch
Before installing a new light switch, you must get it ready. This step ensures safety and a successful installation.
Inspect The New Switch
First, check the new switch for any damage. Make sure it is in good condition. Look for cracks, chips, or loose parts.
Next, read the switch’s instructions. Each switch may have different requirements. Understanding these instructions is crucial.
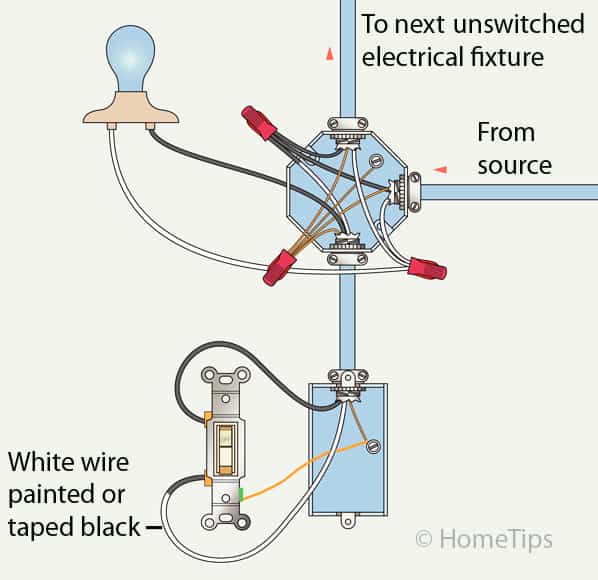
Understand The Wiring
Understanding the wiring is key to a safe installation. The new switch will have three main wires:
- Live Wire: Usually red or brown, carries power to the switch.
- Neutral Wire: Typically blue or black, completes the circuit.
- Ground Wire: Green or bare copper, provides safety.
Compare these wires with your old switch. They should match in color and function. If not, consult an electrician.
Use a wiring diagram if provided. This helps in connecting the wires correctly.
Now, you are ready to proceed with the installation. Ensure you have all necessary tools and follow safety guidelines.
Connecting The Wires
Installing a light switch can seem tricky. The most crucial step is connecting the wires correctly. This ensures your switch works and you stay safe. Follow these steps to connect the wires properly.
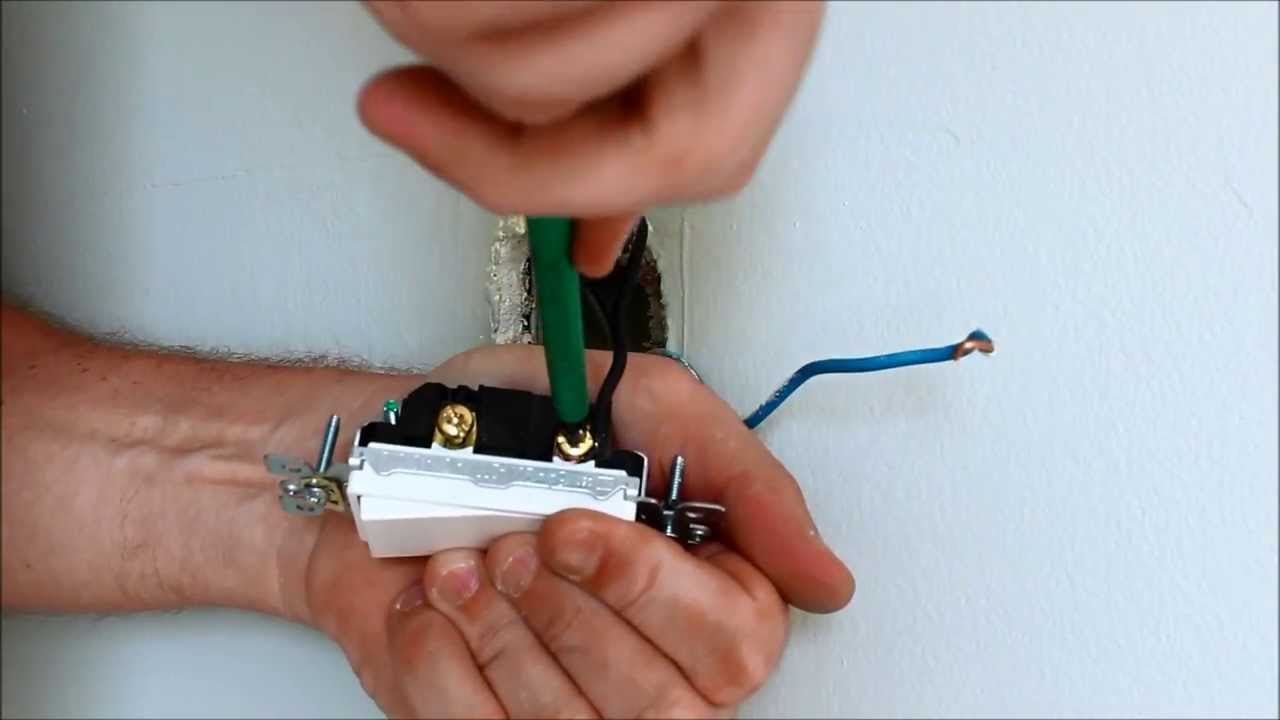
Attach Ground Wire
The ground wire is crucial for safety. It usually has green insulation or is bare.
- Locate the ground wire in your electrical box.
- Find the green screw on the switch.
- Wrap the ground wire around the green screw.
- Use a screwdriver to tighten the screw securely.
Make sure the connection is tight. A loose connection can be dangerous.
Connect Hot Wires
Hot wires are usually black or red. These wires carry the electrical current.
- Identify the hot wires in the electrical box.
- Locate the brass screws on the switch.
- Attach one hot wire to each brass screw.
- Tighten the screws with a screwdriver.
Ensure the wires are snug. Loose hot wires can cause malfunctions.
Always double-check your connections. Proper wiring is key to a safe installation.
:max_bytes(150000):strip_icc()/how-to-wire-and-install-single-pole-switches-1152330-05-2de77af170364a6fb3846f30634a5cd3.jpg)
Credit: www.thespruce.com
Securing The Switch
After wiring the light switch, the next step is securing it. This ensures the switch stays in place and functions correctly.
Mount The Switch
First, gently push the wires back into the electrical box. Align the light switch with the holes on the electrical box. Use a screwdriver to secure the switch to the box with screws. Ensure the switch is level and tightly secured. This prevents any wobbly connections.
Reattach The Cover Plate
Place the cover plate over the switch. Align the holes on the plate with the switch screws. Use a screwdriver to tighten the screws on the cover plate. Make sure the plate sits flush against the wall. This gives a neat and finished look. Check that the switch moves freely.
Testing The Installation
After installing a light switch, the next step is crucial. Testing the installation ensures everything works correctly. Follow these steps to verify your work.
Turn On Power
Restore power to the circuit at the breaker box. Carefully switch the breaker back on. Ensure no one is near the light switch.
Check Functionality
Flip the light switch to the “on” position. Observe if the light turns on. Then, flip it to the “off” position.
- If the light turns on and off, the installation is successful.
- If the light does not turn on, check the connections.
Use a voltage tester to ensure there are no loose wires. Double-check all connections and tighten as needed.
Troubleshooting Tips
Sometimes, installing a light switch can go wrong. These troubleshooting tips will help. Learn to identify and solve common issues. Know when to call a professional.
Common Issues
Here are some common problems you might face:
- Light does not turn on: Check if the lightbulb is working.
- Switch feels warm: This may indicate a wiring problem.
- Flickering light: Ensure all connections are tight.
When To Call A Professional
Some issues need professional help. Here are signs you need an expert:
- Burning smell: This is a serious safety hazard.
- Switch sparks: This could cause an electrical fire.
- Repeated issues: Continuous problems mean deeper issues.
| Issue | DIY Fix | Call a Pro |
|---|---|---|
| Light does not turn on | Check lightbulb | Repeated failure |
| Switch feels warm | Check wiring | Burning smell |
| Flickering light | Tighten connections | Continuous flickering |
Credit: www.youtube.com
Frequently Asked Questions
How Do I Install A Light Switch?
To install a light switch, first turn off the power. Remove the old switch, connect the new switch wires, and secure it. Finally, turn the power back on.
What Tools Do I Need For Installing A Light Switch?
For installing a light switch, you need a screwdriver, wire stripper, voltage tester, and electrical tape. These tools ensure a safe and efficient installation process.
Can I Install A Light Switch Myself?
Yes, you can install a light switch yourself if you follow safety precautions. Ensure the power is off and follow step-by-step instructions carefully.
How Long Does It Take To Install A Light Switch?
Installing a light switch typically takes around 30 minutes. This includes turning off power, removing the old switch, and installing the new one.
Conclusion
Installing a light switch is a simple task with the right tools and guidance. Follow these steps carefully to ensure safety. Remember to always turn off the power before starting. With a bit of patience, you can upgrade your home’s lighting effortlessly.
Share your success stories or tips in the comments below!


1 thought on “How to Install a Light Switch: Step-by-Step Guide”