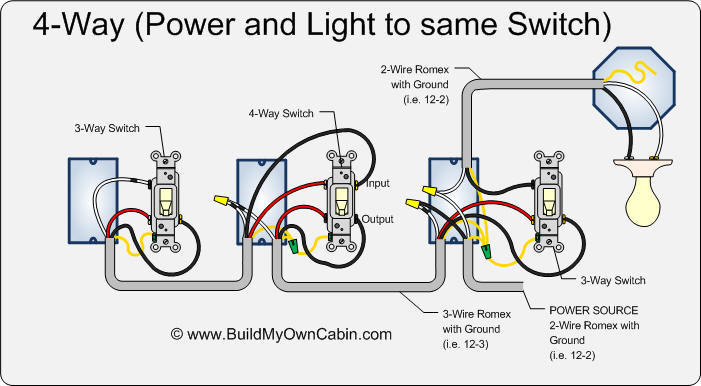
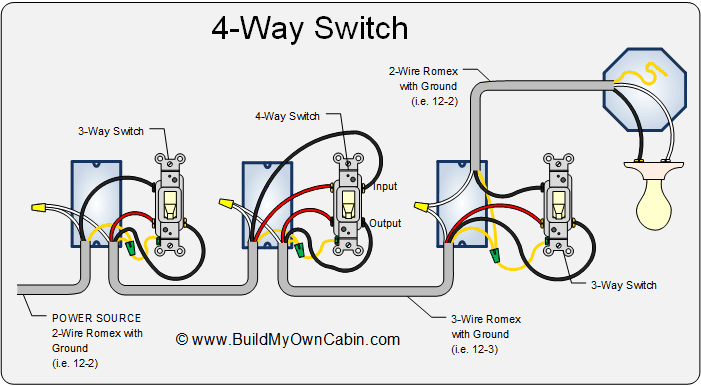
A 4-way switch allows control of a light from three or more locations. It involves two 3-way switches and one or more 4-way switches.
A 4-way switch system is essential for large spaces like hallways or staircases where multiple controls are necessary. It includes a combination of 3-way and 4-way switches to achieve this functionality. The 3-way switches are placed at the endpoints, while the 4-way switches are installed in between.
This setup allows you to turn the light on or off from any switch, providing convenience and flexibility. Proper wiring and understanding of the circuit are crucial for effective installation. Always ensure safety by turning off the power before starting any electrical work.
Credit: www.buildmyowncabin.com
Introduction To 4-way Switches
Understanding 4-way switches can greatly improve your home lighting system. These switches offer flexibility and convenience for controlling lights from multiple locations.
What Is A 4-way Switch?
A 4-way switch is a device used to control a single light from three or more locations. It works in conjunction with two 3-way switches. Here is a simple breakdown:
- 3-way switch: Controls a light from two locations.
- 4-way switch: Adds control from additional locations.
This switch has four terminals, unlike a 3-way switch which has three. The extra terminals make it possible to connect with more switches. This setup is ideal for large rooms or long hallways.
Importance In Home Lighting
The importance of 4-way switches in home lighting cannot be overstated. They provide convenience and flexibility. Here are some key benefits:
| Benefit | Description |
|---|---|
| Convenience | Control lights from multiple locations. |
| Flexibility | Suitable for large rooms and long hallways. |
| Safety | Reduce the need to walk in the dark. |
| Energy Efficiency | Turn off lights easily from various points. |
Installing 4-way switches enhances the overall functionality of your home lighting system. It makes your living space more comfortable and user-friendly.
Basic Electrical Concepts
Understanding basic electrical concepts is essential for any DIY electrical project. Whether you’re a novice or have some experience, grasping these concepts ensures safety and efficiency. This section will guide you through the fundamentals needed for 4 way switch wiring.
Circuit Basics
A circuit is a closed loop that allows electricity to flow. It consists of a power source, conductors, and a load. The power source provides the electricity. Conductors, usually wires, carry the electricity. The load uses the electricity to perform work, like lighting a bulb.
Electricity flows from the power source, through the conductors, to the load, and back to the power source. This flow is called a current. Interrupting the current stops the electrical flow. Switches control this flow by opening and closing the circuit.
Understanding Poles And Throws
Switches have poles and throws. A pole is the number of circuits a switch can control. A throw is the number of positions a switch can take.
| Term | Definition |
|---|---|
| Single Pole | Controls one circuit. |
| Double Pole | Controls two circuits. |
| Single Throw | Has one position. |
| Double Throw | Has two positions. |
A 4 way switch has two poles and two throws. This means it can connect or disconnect two different circuits, and it can switch between two positions.
Understanding these basic electrical concepts will help you with 4 way switch wiring. Always ensure safety by turning off the power before starting any electrical work. Use the right tools and follow all guidelines.
Tools And Materials Needed
Before starting your 4-way switch wiring project, gather all necessary tools and materials. Being prepared will make the process smoother and safer. Below are the essential tools and required materials for this task.
Essential Tools
- Wire Strippers: For removing insulation from the wires.
- Voltage Tester: To ensure the circuit is de-energized.
- Screwdrivers: Both flathead and Phillips are needed.
- Needle-Nose Pliers: Useful for bending wires.
- Electrical Tape: For insulating connections.
- Wire Nuts: To secure wire connections.
Required Materials
| Material | Quantity | Description |
|---|---|---|
| 4-Way Switches | 1 or 2 | Needed for controlling lights from three or more locations. |
| 3-Way Switches | 2 | Required at the ends of the circuit. |
| Electrical Box | 3 or more | Holds the switches and wiring connections. |
| Electrical Wire | As needed | 14 or 12 gauge, depending on your circuit. |
| Wire Connectors | As needed | For joining wires securely. |
Ensure you have all these tools and materials ready before you start. This will help you complete the project efficiently.
Safety Precautions
Handling electrical wiring can be dangerous. Safety precautions are essential. Following these steps ensures a safe working environment. Let’s dive into the key safety measures for 4 way switch wiring.
Turning Off Power
Always turn off the power before starting any electrical work. This prevents electrical shocks and injuries.
- Locate your home’s circuit breaker panel.
- Identify the circuit controlling the switches.
- Flip the breaker switch to the “off” position.
- Use a voltage tester to confirm the power is off.
Using Safety Gear
Wearing proper safety gear is crucial. It adds an extra layer of protection.
- Wear rubber-soled shoes to avoid electrical conduction.
- Use insulated gloves to handle wires safely.
- Safety glasses protect your eyes from debris.
Here is a quick checklist for your safety gear:
| Safety Gear | Purpose |
|---|---|
| Rubber-soled Shoes | Prevent electrical conduction |
| Insulated Gloves | Handle wires safely |
| Safety Glasses | Protect eyes from debris |
By following these safety precautions, you ensure a safer work environment. Your project will be both safe and successful.
Step-by-step Wiring Guide
Understanding how to wire a 4-way switch can seem challenging. This guide breaks down the process into simple steps. Follow these instructions to ensure a safe and efficient installation.
Wiring A Single-pole Switch
To start, you need to wire a single-pole switch. Here’s how:
- Turn off the power at the circuit breaker.
- Remove the switch cover plate using a screwdriver.
- Disconnect the old switch from the electrical box.
- Connect the black (hot) wire to the brass terminal.
- Attach the white (neutral) wire to the silver terminal.
- Connect the ground wire to the green terminal.
- Secure the switch back into the electrical box.
- Replace the switch cover plate.
- Turn the power back on to test the switch.
Adding The 4-way Switch
Next, add the 4-way switch to your setup. Follow these steps:
- Ensure the power is still off at the circuit breaker.
- Install two 3-way switches at the start and end points.
- In the middle, place the 4-way switch.
- Identify the traveler wires from the 3-way switches.
- Connect one pair of traveler wires to the input terminals on the 4-way switch.
- Connect the second pair of traveler wires to the output terminals.
- Attach the ground wire to the green terminal on the 4-way switch.
- Secure the 4-way switch into the electrical box.
- Replace the switch cover plate.
- Turn the power back on to test the entire system.
By following these steps, you will have a correctly wired 4-way switch system. This allows you to control a single light from multiple locations.

Credit: nassaunationalcable.com
Troubleshooting Common Issues
Understanding 4 Way Switch Wiring can be tricky. Many homeowners face common issues. Troubleshooting these issues helps keep your lights working. Let’s dive into the common problems and their solutions.
Identifying Common Problems
A few common problems can occur with 4 way switch wiring. Identifying them is the first step.
- Lights flickering: This can be due to loose connections.
- Switches not working: Often due to wiring mistakes.
- Lights not turning on: This could be a faulty switch.
Solutions And Fixes
Here are solutions to fix the common problems.
| Problem | Solution |
|---|---|
| Lights flickering | Tighten all connections and check for damaged wires. |
| Switches not working | Double-check your wiring against a diagram. |
| Lights not turning on | Replace the faulty switch with a new one. |
Follow these steps to troubleshoot:
- Turn off the power at the breaker.
- Inspect all connections for tightness.
- Check your wiring against a 4 way switch diagram.
- Replace any faulty switches or wires.
- Turn the power back on and test the switches.
4 Way Switch Wiring issues can be resolved with careful inspection. Always ensure your safety by turning off the power first.
Advanced Wiring Techniques
Mastering 4-way switch wiring can significantly improve your home’s lighting. Advanced wiring techniques offer greater control and flexibility. These techniques ensure that your lighting setup is both functional and convenient.
Using Multiple 4-way Switches
Adding multiple 4-way switches allows control from several locations. This setup is ideal for large rooms or hallways.
- Start with a 3-way switch at the beginning.
- Connect the 4-way switches in between.
- End with another 3-way switch.
Follow these steps for wiring:
- Turn off the power.
- Connect the common terminals.
- Link traveler wires between switches.
Using a multimeter ensures connections are correct. Labeling wires helps avoid confusion during installation. This method brings flexibility to your lighting system.
Integrating Smart Home Systems
Integrating smart home systems with your 4-way switches offers advanced control. This integration allows for remote access and automation.
| Device | Function |
|---|---|
| Smart Switch | Replaces traditional 4-way switches |
| Smart Hub | Central control unit |
| Mobile App | Remote control and automation |
Steps to integrate:
- Install smart switches at desired locations.
- Connect to a smart hub.
- Use the mobile app for setup and control.
Smart home integration enhances convenience and energy efficiency. It offers features like voice control and scheduling. This makes your lighting system modern and user-friendly.
Maintenance And Upgrades
Proper maintenance and timely upgrades ensure your 4-way switch wiring system runs smoothly. This section will guide you through essential maintenance tips and upgrading your system to modern standards.
Regular Maintenance Tips
Regular maintenance keeps your 4-way switch wiring safe and functional. Here are some tips:
- Inspect your switches monthly. Look for signs of wear or damage.
- Tighten loose screws. Loose connections can cause malfunctions.
- Clean the switches. Dust and debris can affect performance.
- Test the switches. Ensure they work correctly.
- Label wires clearly. It helps during future maintenance.
Upgrading To Modern Systems
Upgrading to modern systems enhances safety and efficiency. Consider these upgrades:
- Smart Switches: Control lights with a smartphone or voice command.
- Energy-Efficient Switches: Reduce energy consumption with advanced technology.
- Wireless Switches: Simplify installation and reduce wiring needs.
- Dimmer Switches: Adjust lighting levels to create the perfect ambiance.
Upgrading your 4-way switch wiring can be straightforward. Here’s a comparison table of traditional vs. modern systems:
| Feature | Traditional System | Modern System |
|---|---|---|
| Control | Manual | Smartphone/Voice |
| Energy Efficiency | Standard | High |
| Installation | Complex | Simplified |
| Lighting Options | On/Off | Dimmer |
Regular maintenance and upgrades ensure your 4-way switch system stays reliable and efficient. Whether maintaining or upgrading, these tips keep your home safe and modern.
Conclusion And Tips
Wiring a 4-way switch can seem challenging, but with clear instructions, it becomes manageable. This section will provide you with some final thoughts and useful tips to ensure your wiring project is a success.
Final Thoughts
Understanding the wiring process is critical. Make sure you follow a clear diagram. Safety should always come first. Turn off the power before starting. Use a voltage tester to ensure no electricity is flowing. Having the right tools is important. Use a screwdriver, wire stripper, and electrical tape.
Double-check your connections before turning the power back on. Ensure all wires are securely connected. Label each wire to avoid confusion. This is especially useful for beginners. Be patient and take your time to avoid mistakes.
Additional Resources
Here are some additional resources to help you with your 4-way switch wiring project:
- Online Tutorials: Websites like YouTube offer step-by-step video guides.
- Electrical Codes: Check your local electrical codes for compliance.
- Manuals: Refer to the manuals of your specific switches for guidance.
- Professional Help: If unsure, consult a licensed electrician.
For a quick reference, here is a simple table of tools you might need:
| Tool | Purpose |
|---|---|
| Screwdriver | Tightening and loosening screws |
| Wire Stripper | Stripping insulation from wires |
| Voltage Tester | Checking for live wires |
| Electrical Tape | Insulating wire connections |
Remember, practice makes perfect. The more you work with electrical wiring, the more confident you’ll become.
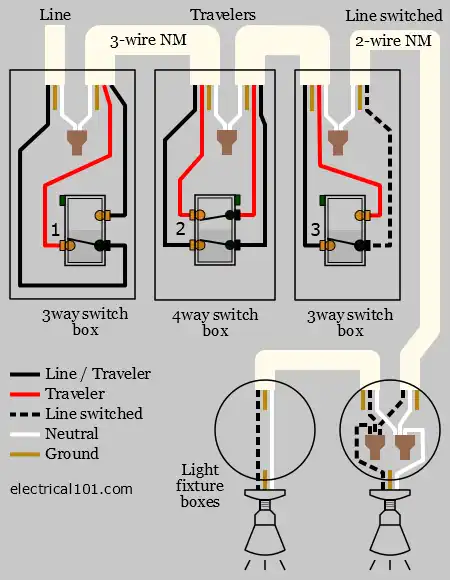
Credit: www.electrical101.com
Frequently Asked Questions
What Is A 4 Way Switch Wiring?
A 4-way switch wiring controls lighting from three or more locations. It is commonly used in hallways and large rooms.
How Do I Install A 4 Way Switch?
To install a 4-way switch, you’ll need two 3-way switches and one 4-way switch. Follow the wiring diagram closely.
What Tools Are Needed For 4 Way Switch Wiring?
You’ll need a screwdriver, wire stripper, electrical tape, and a voltage tester to safely install a 4-way switch.
Can A Beginner Install A 4 Way Switch?
Yes, a beginner can install it. However, following detailed instructions and safety precautions is crucial for a successful installation.
Conclusion
Mastering 4-way switch wiring enhances your home lighting control. Follow the steps carefully for a successful installation. Ensure all connections are secure and tested. With the right tools and patience, you can achieve professional results. Enjoy the convenience and flexibility this setup offers.
Happy wiring!


Appreciate it for all your efforts that you have put in this. very interesting information.