A multimeter is a measuring instrument used to measure multiple electrical properties including voltage, resistance, and current. It can be used as a voltmeter, ammeter, and ohmmeter, and some models even feature additional measurements like temperature and capacitance.
Multimeters are made up of a digital or analog meter, batteries, resistors, and other circuitry, which ensure accurate and speedy measurements of various electrical quantities. We will dive into the basics of multimeters, including the different types, and components, and how to use them for beginners.
Additionally, we will explore what to consider when purchasing a multimeter and how much they typically cost.

Credit: www.amazon.com
Introduction To Multimeters
A multimeter is a device used to measure multiple electrical properties like voltage, resistance, and current, making it useful as a voltmeter, ammeter, and ohmmeter. Some models can also measure temperature and capacitance. Multimeters come in both analog and digital displays for accurate and speedy measurements.
What Is A Multimeter?
A multimeter is a versatile device that can measure various electrical quantities within an electric circuit. Typically, a multimeter measures three fundamental properties of an electric circuit, including voltage, current, and resistance, allowing it to function as a voltmeter, ammeter, and ohmmeter.
Components Of A Multimeter
A typical multimeter is made up of various components, including a display screen, a dial, ports, and probes. The display screen is where you will read the measurements, while the dial is used to set the device to the correct measurement setting. The probes are typically made up of a red and black wire that can be connected to the ports on the multimeter to measure different quantities, such as voltage or current.
Types Of Multimeters
Multimeters come in two primary types, digital and analog. Analog multimeters use a dial and needle to measure and display electrical quantities, while digital multimeters use a digital screen to display measurements. The type of multimeter you choose to use depends on your personal preference and the type of electrical work you are doing. Overall, multimeters are essential tools for anyone working with electrical circuits. Understanding the various components and features of a multimeter can help you use the device safely and efficiently.
How To Use A Multimeter
A multimeter is a versatile tool used to measure electric properties such as voltage, current, and resistance. To use it, set the dial to the desired function, connect the test leads, and read the measurement from the display. With its many features, a multimeter is an essential tool for any electrician or DIY enthusiast.
Have you ever found yourself in a situation where you needed to measure the voltage, current, or resistance in an electrical circuit, but didn’t know how? A multimeter is a great tool to have on hand in these situations! Here is a beginner’s guide on using a multimeter, with step-by-step instructions on how to set it up and measure the various electrical properties.
Setting Up The Multimeter
Before taking any measurements, it’s important to properly set up the multimeter. Here’s how to do it:
- Turn on the multimeter: Most multimeters have an on/off switch or button. Turn it on to begin.
- Select the appropriate function: Turn the dial to the function you want to measure, such as voltage (V), current (A), or resistance (Ω).
- Select the range: Choose the range of the function you want to measure. The range should be higher than the expected value to prevent damage to the multimeter.
- Connect the test leads: Connect the test leads to the multimeter. The red lead is typically connected to the positive (+) terminal, while the black lead is connected to the negative (-) terminal.
- Test the multimeter: Test the multimeter by measuring a known voltage or resistance. This will ensure that the multimeter is working correctly.
To measure voltage using a multimeter, follow these steps:
- Set the multimeter to measure voltage.
- Select the appropriate range: Choose a range higher than the expected voltage.
- Connect the test leads: Connect the red lead to the positive end of the circuit and the black lead to the negative end of the circuit.
- Measure the voltage: Read the voltage from the multimeter display.
To measure current using a multimeter, follow these steps:
- Set the multimeter to measure the current.
- Select the appropriate range: Choose a range higher than the expected current.
- Connect the leads: Insert the multimeter leads into the circuit, in series with the component being measured. The red lead should be connected to the positive end of the circuit and the black lead to the negative end of the circuit.
- Measure the current: Read the current from the multimeter display.
To measure resistance using a multimeter, follow these steps:
- Set the multimeter to measure resistance.
- Select the appropriate range: Choose a range higher than the expected resistance.
- Disconnect the power: Disconnect the power from the circuit being measured.
- Connect the test leads: Connect the test leads to the circuit being measured. The red lead should be connected to one end of the resistor, while the black lead should be connected to the other end.
- Measure the resistance: Read the resistance from the multimeter display.
And there you have it! With this guide, you should now be able to use a multimeter to accurately measure electrical properties.
Advanced Multimeter Features
An advanced multimeter can measure multiple electrical properties, including voltage, resistance, and current, and can be used as a voltmeter, ammeter, and ohmmeter. Some models also feature the measurement of additional properties such as temperature and capacitance. These features allow for precise and accurate measurement of electrical circuits.
One of the advanced features of a multimeter is its ability to measure capacitance. This can be useful when working with electronic components that store electrical charge, such as capacitors. To measure capacitance, the multimeter is set to the appropriate range and the two test leads are connected to the capacitor. The multimeter will then display the capacitance in units of farads or microfarads, depending on the range selected. This feature is particularly useful when repairing or troubleshooting electronic devices. Another advanced feature of a multimeter is its ability to measure frequency. This can be useful when working with electronic circuits that use alternating current (AC), such as audio amplifiers or oscillators. To measure frequency, the multimeter is set to the appropriate range and the test lead is connected to the signal source. The multimeter will then display the frequency in units of hertz (Hz) or kilohertz (kHz). This feature is particularly useful when designing or testing electronic circuits. Multimeters also can test diodes, which are electronic components that allow current to flow in one direction only. This can be useful when verifying the polarity of a diode or checking for a faulty diode in a circuit. To test a diode, the multimeter is set to the diode test mode and the test leads are connected to the diode. The multimeter will then display the voltage drop across the diode. If the voltage drop is within the expected range, the diode is functioning properly. Multimeters with advanced features also can test transistors, which are electronic components that amplify or switch electronic signals. This can be useful when verifying the performance of a transistor or checking for a faulty transistor in a circuit. To test a transistor, the multimeter is set to the transistor test mode and the test leads are connected to the transistor. The multimeter will then display the gain, which is a measure of the amplification provided by the transistor. If the gain is within the expected range, the transistor is functioning properly. In conclusion, advanced multimeter features such as measuring capacitance, frequency, diode testing, and transistor testing can be extremely useful when working with electronic devices and circuits. These features not only save time but also ensure accurate readings and reliable results. It is important to choose a multimeter that meets your specific needs and has the features required for your particular applications.
Safety Tips For Using A Multimeter
When using a multimeter, always prioritize safety. Before beginning your measurements, ensure that the multimeter is rated for the type of circuit you will be working with. Additionally, avoid pushing the multimeter beyond its limits, and never use it to measure voltage while the circuit is in operation.
Remember to always wear protective equipment and follow the manufacturer’s instructions carefully.
ols (V~ and V-) for AC and DC, respectively. Once you set the dial to the desired voltage type, you can begin taking measurements. However, before you start using a multimeter, it is important to know the safety tips. Here are some safety tips for using a multimeter:
Choosing The Right Multimeter For The Job
When choosing a multimeter, it is important to consider the job you intend to use it for. Different multimeters are designed for different purposes, and choosing the right one will ensure you get accurate measurements and avoid unnecessary risks. Some multimeters are ideal for automotive work, while others are better suited for laboratory work. Make sure you choose the appropriate multimeter for your task to ensure safety and accuracy.
Avoiding Electric Shock
Multimeters are designed to measure electricity, so there is always a risk of electric shock when using one. To minimize the risk, make sure you follow these tips: – Always turn off power and disconnect any circuit before measuring voltage or resistance. – Use insulated probes to avoid touching live components. – Never touch the probes while measuring current as it can cause electric shock or damage the multimeter.
Protecting The Multimeter
A multimeter is a sensitive instrument that requires proper maintenance to keep it functioning efficiently and accurately. To ensure your multimeter remains in good condition: – Store the multimeter in a dry, clean place, away from direct sunlight. – Never expose the multimeter to extreme temperatures or humidity. – Always use the right probes and accessories that are compatible with your multimeter. In conclusion, using a multimeter can be safe and accurate if you follow these safety tips. Choosing the right multimeter for the job, avoiding electric shock, and protecting the multimeter are the key steps to ensure you get an accurate measurement and keep yourself safe.
Buying Guide For Multimeters
If you’re in search of measuring multiple electrical properties, then a multimeter is the perfect tool for you. This device can measure voltage, resistance, and current, and some can even measure temperature and capacitance. Learn more about multimeters in our buying guide to make an informed purchase decision.
Buying Guide for Multimeters If you are looking for a tool to measure various electrical properties, a multimeter is the perfect device. It can measure voltage, current, and resistance, and some even measure temperature and capacitance. However, before buying a multimeter, there are several factors you need to consider. In this buying guide, we will discuss these factors and provide you with a list of top brands and price ranges.
Purpose:
Determine the use and requirements of the multimeter. If you are a beginner, you may only need a basic one that measures voltage and resistance. If you are an electrician, you may need one that measures current and capacitance, among others.
Accuracy:
Check the accuracy of the multimeter. It is essential that the device accurately measures the electrical properties.
Sensitivity:
You will need a multimeter that can measure small changes in the electrical properties, especially if you work with low-powered circuits.
Safety Features:
Check if the multimeter has safety features such as fused current protection, overload protection, and non-contact voltage detection.
Display:
The display should be easy to read and understand. Choose between an analog or digital display. Digital displays are more accurate, but analog displays can show changes much faster.
Price Range
The price of a multimeter varies depending on its features. Basic ones can cost as little as $10, while more advanced models can cost up to $500. The price range for a good multimeter is between $50 and $150.
Top Brands
Fluke:
Fluke is a well-known brand that offers high-quality and accurate multimeters. They are ideal for professionals and come with various features.
ANENG:
ANENG is a relatively new brand that offers affordable and reliable multimeters. They are battery-efficient, easy to use, and perfect for beginners.
Klein Tools:
Klein Tools is a trusted brand that offers durable and reliable multimeters. They come with various features such as auto-ranging and backlights.
Uni-T:
Uni-T is a popular brand that offers affordable and accurate multimeters. They are perfect for DIY enthusiasts and beginners. In conclusion, when buying a multimeter, consider the purpose, accuracy, sensitivity, safety features, and display. Choose a multimeter within the price range of $50 to $150, and trust reliable brands such as Fluke, ANENG, Klein Tools, and Uni-T.
Credit: www.ebay.com
Measuring Voltage
A multimeter is a versatile device used to measure voltage, resistance, and current. It can function as a voltmeter, ammeter, and ohmmeter, with some models capable of measuring additional properties like temperature and capacitance. To use a multimeter, set the dial to the appropriate voltage symbol for AC or DC voltage measurement.
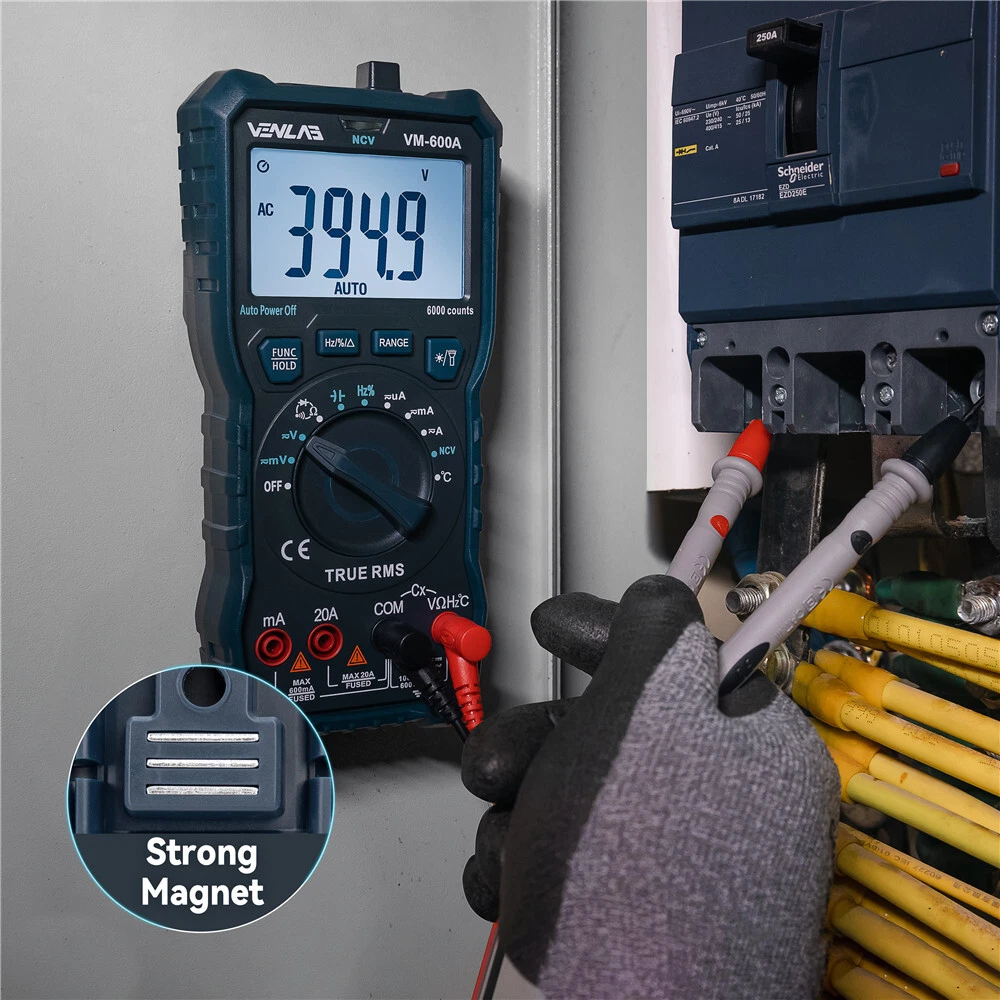
Measuring Voltage A multimeter is a versatile tool used to measure various electrical properties in a circuit. When it comes to measuring voltage, a multimeter can measure both direct current (DC) voltage and alternating current (AC) voltage. As a result, it’s essential to understand how to measure voltage using a multimeter and the differences between AC and DC voltage. This section will explore how to measure voltage with a multimeter, the differences between AC and DC voltage, and what voltage to set on a multimeter. How to Measure Voltage with a Multimeter To measure voltage with a multimeter, follow these easy steps: 1. Turn on the multimeter and set its dial to the voltage setting. 2. Connect the probes to the circuit or the component you want to measure. 3. Place the red probe on the positive side and the black probe on the negative side. 4. Read the value displayed on the multimeter screen. That’s it! You’ve successfully measured the voltage of the specific circuit or component. It’s essential to note that the voltage level you’re measuring in the circuit does not go beyond the range of the multimeter. Difference between AC and DC Voltage AC and DC voltage are the two types of voltage commonly used in electronics. DC voltage is the unidirectional flow of current from a positive terminal to a negative terminal, while AC voltage is the oscillating flow of current that changes direction periodically. A multimeter can measure both AC and DC voltage, but it’s essential to know which type of voltage you’re measuring to set the multimeter correctly. What Voltage to Set on Multimeter Before taking any measurements, you need to set your multimeter dial to either AC or DC voltage. Your multimeter will have two voltage symbols around the dial, indicating AC or DC voltage. Set your multimeter to the appropriate voltage setting to prevent damage to the meter and circuits you’re measuring. It’s crucial to set the voltage to the highest value first and gradually reduce it until you get a precise reading. In conclusion, measuring voltage using a multimeter is easy, but it’s essential to understand the differences between AC and DC voltage and what voltage to set on a multimeter. By following the steps listed above, you’ll be able to measure voltage accurately, which is crucial in troubleshooting electronics and detecting faults.
Measuring Current
A multimeter is a measuring instrument used to measure multiple electrical properties in an electric circuit like voltage, resistance, and current. It can function as a voltmeter, ammeter, and ohmmeter and can include additional properties such as temperature and capacitance.
Using a multimeter with high accuracy and speed is crucial for measuring current.
When it comes to Measuring Current with a multimeter, it’s important to understand the basics of how to use it. A multimeter can measure both AC (Alternating Current) and DC (Direct Current) Currents. In this article, we’ll discuss the different methods to measure current with a multimeter, the difference between AC and DC Current, and what current to set on your multimeter.
How To Measure Current With A Multimeter
To measure current using a multimeter, you need to follow a few steps: 1. Set the multimeter to the current mode. 2. Identify the current you’re going to measure (AC or DC). 3. Connect the multimeter in series with the circuit (make sure to break the circuit first). 4. Turn on the power source. 5. Observe the reading on the multimeter and record it. 6. Turn off the power source and remove the multimeter.
Difference Between AC and DC Current
AC is a type of current that changes direction periodically. It is used for the transmission of electricity over long distances. DC is a type of current that flows in only one direction and is used for electronic devices like batteries and capacitors.
What Current To Set On Multimeter
Before measuring current, you need to set the multimeter to either the AC or DC mode, depending on what you’re trying to measure. If you’re measuring AC, make sure to set the multimeter to the AC mode. Similarly, if you’re measuring DC, set it to the DC mode. You can find these modes on the dial of your multimeter. In conclusion, measuring current with a multimeter can be a straightforward process if you know the steps involved. It’s important to understand the difference between AC and DC currents and the current mode to set on your multimeter before measuring current accurately.
Measuring Resistance
A multimeter is a device that can measure various electrical properties, including voltage, resistance, and current. Some models also offer additional features such as temperature and capacitance measurement. Multimeters are essential tools for both professionals and hobbyists who work with electrical circuits and equipment.
Multimeters are essential tools for anyone working with electrical circuits. They can measure multiple electrical properties, including voltage, current, and resistance. When it comes to measuring resistance, multimeters are incredibly useful. In this article, we will discuss how to measure resistance with a multimeter, what the ohms symbol on a multimeter means, and what to set your multimeter to when measuring resistance.
How To Measure Resistance With A Multimeter
To measure resistance with a multimeter, you need to set it to the resistance or ohms setting. The symbol for resistance is the Greek letter omega (Ω), which is usually located on the multimeter dial. Once you have located the symbol, turn the dial to the resistance setting. Next, touch the probes together and note the reading on the multimeter. This reading is known as the “zero ohms” or “continuity” reading, and it represents the resistance of the probes and the wires connecting them. To measure the resistance of a component, touch one probe to one end of the component and the other probe to the other end. The multimeter will display the resistance of the component in ohms (Ω).
What Is Ohm Symbol On A Multimeter?
The ohm symbol on a multimeter is the Greek letter omega (Ω). This symbol represents the unit of electrical resistance, which is measured in ohms. It is used to indicate the resistance range setting on a multimeter, which is typically labeled with the ohms symbol.
What To Set On Multimeter For Resistance
To measure resistance with a multimeter, you need to set it to the resistance or ohms setting. Once you have located the ohm symbol on your multimeter, turn the dial to the resistance setting. This setting is usually labeled with the ohm symbol (Ω) and a range of values. To measure the resistance of a component, touch one probe to one end of the component and the other probe to the other end. The multimeter will display the resistance of the component in ohms (Ω). If the reading is outside the range of the multimeter, adjust the range setting until you get a valid reading. In conclusion, measuring resistance with a multimeter is a simple process that requires the right settings and probes. By following the steps outlined above, you can accurately measure the resistance of electrical components and troubleshoot circuit problems. Remember to always exercise caution when working with live electrical circuits, and choose a multimeter that is suited to your needs.
Measuring Capacitance
To measure capacitance using a multimeter, switch to capacitance mode and connect the test leads to the capacitor. The multimeter displays the capacitance value in farads or microfarads. This is useful when working with electrical circuits that require capacitors of specific values to function properly.
Measuring Capacitance with a Multimeter A multimeter is a versatile measuring instrument that can measure various properties of an electric circuit with great accuracy and speed. One of its additional features is the measurement of capacitance. Capacitance defines an object’s ability to store an electric charge. Multimeters have a capacitance measuring mode that allows you to determine the capacitance of capacitors or identify a component’s capacitance value. Here are some tips on how to measure capacitance with a multimeter. H3: How to Measure Capacitance with a Multimeter To measure capacitance with a multimeter, follow these simple steps: 1. Turn off the circuit before making any measurements. 2. Connect the black multimeter probe to the negative terminal of the capacitor to be measured. 3. Attach the red multimeter probe to the positive terminal of the capacitor, ensuring that the probes are in contact with the metal parts of the capacitor, rather than the insulation. 4. Set your multimeter to capacitance mode. Depending on your multimeter model, this may be represented by the letters “F” or “C”. 5. Read the capacitance value on the multimeter display. H3: What to Set on Multimeter for Capacitance When measuring capacitance with a multimeter, set your multimeter to capacitance mode, which is usually represented by “F” or “C”. It’s important to ensure that the probes are correctly connected to the capacitor’s terminals, as attaching them to the insulation rather than the metal parts can lead to inaccurate readings. Once the multimeter is connected correctly, read the capacitance value on the multimeter display. By following these simple steps, you can measure capacitance accurately and with ease. In conclusion, measuring capacitance with a multimeter can be done quickly and efficiently. Setting your multimeter to capacitance mode and correctly attaching the probes to the component terminals are crucial to getting accurate readings. Now that you know how to measure capacitance with a multimeter, you can confidently take on any electrical project that requires capacitance measurements.
Measuring Frequency
A multimeter is a measuring instrument that can measure multiple electrical properties, including voltage, resistance, and current. Some multimeters also feature the measurement of additional properties such as temperature and capacitance. Measuring frequency is also possible with a multimeter, making it a versatile and valuable tool for electrical troubleshooting and maintenance.
Measuring Frequency with a Multimeter Measuring frequency is an essential task in electrical engineering, and a multimeter is an excellent device to do it. Frequency denotes the number of cycles per second of the electrical wave, and it is measured in hertz (Hz). In this section, we will discuss how to measure frequency with a multimeter and what settings you need to adjust on your multimeter. How to Measure Frequency with a Multimeter Follow the below steps to measure frequency with a multimeter: 1. Turn on your multimeter and set the dial to the frequency (Hz) setting. 2. Connect the test leads to the circuit you want to measure. 3. Make sure the circuit is powered on and producing a voltage signal. 4. The multimeter will display the frequency reading. If your multimeter doesn’t have a frequency setting, you can still measure the frequency with the voltage setting. Set your multimeter to read AC voltage, and the frequency measurement will appear alongside the voltage reading. What to Set on Multimeter for Frequency To measure frequency with a multimeter, you need to set it to the frequency (Hz) setting. If your multimeter doesn’t have a dedicated frequency setting, look for the voltage setting, which will also measure frequency. In some cases, you may need to adjust other settings like the range or sensitivity to get an accurate frequency reading. In conclusion, measuring frequency with a multimeter is a straightforward process. You only need to set the multimeter to the frequency setting, connect the test leads to the circuit, and read the frequency measurement value. Make sure the circuit is powered on and generates a voltage signal to get a precise reading.
Diode Testing
Multimeters are essential tools that measure various electrical properties in circuits. With its capability to measure voltage, resistance, and current, a multimeter can also test diodes, capacitance, and frequency. Learning how to use a multimeter is crucial in electric or electronic work.
multimeters are versatile and handy instruments that are popular among electricians, hobbyists, and DIY enthusiasts. They can be used to test different electrical properties of a circuit, including voltage, resistance, and current. In addition to these features, some multimeters also enable diode testing. Diodes are essential components used to regulate the flow of electrical current in a circuit. They come in different shapes and sizes, and each type serves a specific purpose. Diode testing is crucial to ensure their proper functioning and identify defects if any. Here’s how to test a diode with a multimeter:
How To Test A Diode With A Multimeter
There are two ways to test a diode with a multimeter: forward bias test and reverse bias test. In the forward bias test, the diode is connected in the forward direction, and in the reverse bias test, it is connected in the reverse direction. Follow these steps to test the diode:
Forward Bias Test
1. Set your multimeter to the diode testing mode (usually marked with a diode symbol). 2. Connect the positive lead of the multimeter to the anode (positive end) of the diode and the negative lead to the cathode (negative end). 3. Hold the diode’s leads still to prevent false readings. 4. Read the multimeter’s display. A good diode will show a voltage drop of 0.5 to 0.8 volts. If the display shows OL (overload), the diode is faulty or open.
Reverse Bias Test
1. Set your multimeter to the diode testing mode. 2. Connect the positive lead of the multimeter to the cathode (negative end) of the diode and the negative lead to the anode (positive end). 3. Hold the diode’s leads still to prevent false readings. 4. Read the multimeter’s display. A good diode will show no readings or a small leakage current of a few microamps. If the display shows a full-scale reading or a large leakage current, the diode is faulty or shorted. In conclusion, testing a diode with a multimeter is a straightforward process that requires a little knowledge of how to use the instrument. With the right set of tools and precautions, you can ensure the proper functioning of diodes in a circuit and prevent any accidents or failures.
Transistor Testing
A multimeter is a device that can accurately measure multiple electrical properties, including voltage, resistance, and current. Among other things, it can be used to test transistors, making it an essential tool for anyone working with electronic devices.
Transistor Testing with a Multimeter is a crucial aspect that every individual who works with electronic devices should be conversant with. A transistor is a solid-state device that can significantly amplify or switch electronic signals. To determine whether it is working correctly, it is essential to test it with a multimeter. In this article, we will show you how you can test a transistor with a multimeter, highlighting the steps you need to take to make a proper measurement.
How To Test A Transistor With A Multimeter
The following steps will guide you on how to test a transistor with a multimeter:
Step 1: Identify The Transistor’s Pins
To get started, you must identify the transistor’s pins, which are the three leads protruding from its base. The first pin is the emitter, the second is the base, and the third one is the collector.
Step 2: Set The Multimeter To The Diode Setting
After identifying the transistor’s pins, you need to set the multimeter to the diode setting. On many multimeters, this setting is represented by a symbol that looks like an arrow pointing to a vertical line.
Step 3: Connect The Transistor To The Multimeter
Connect the transistor to the multimeter by connecting the red lead to the base pin and the black lead to the emitter.
Step 4: Read The Results
Once you have connected the transistor to the multimeter, read the results. If the multimeter displays a voltage reading, it means the transistor is good, and it has amplified the current. If the multimeter reads zero, it means the transistor is not conducting, and there could be a problem. In conclusion, testing a transistor with a multimeter is a simple process that can help you identify any issues with the device. By following the steps highlighted above, you can quickly and accurately determine whether your transistor is working correctly. Remember to ensure that your multimeter is properly calibrated for accurate results.
Factors To Consider Before Buying
When considering buying a multimeter, it’s important to think about the specific electrical properties you need to measure. Some multimeters have additional features like temperature and capacitance measurements. Additionally, make sure to compare prices and read reviews to ensure you get the best value for your money.
Factors to Consider Before Buying When it comes to buying a multimeter, there are several factors you must consider. The market is full of a variety of multimeters, and choosing the right one requires careful evaluation of various specs and features. From accuracy to safety features, there are several factors you should take into account. In this blog post, we’ll discuss some of the key factors you should consider before making your final purchase decision. Accuracy Accuracy is an essential factor to consider when it comes to multimeters. Digital multimeters are generally more accurate than analog ones. To ensure you are getting the most accurate readings, look for a multimeter with a high degree of accuracy. For instance, a multimeter with an accuracy of ±0.5% or less is ideal. Resolution Resolution is another critical factor to consider before buying a multimeter. The resolution of a multimeter determines the smallest increment that can be displayed or measured. A high-resolution multimeter can measure smaller increments and provide more accurate readings. Look for a multimeter with a resolution of at least 4000 counts. Safety Features Safety features are essential when it comes to using a multimeter. Multimeters deal with high voltage levels, and therefore, it’s important to ensure that you are protected from electrical hazards. It’s advisable to choose a multimeter that adheres to safety standards such as CAT III or CAT IV. Look for features such as input protection, overload protection, and auto power-off function. Display Type The type of display is also an important factor to consider when choosing a multimeter. There are two primary types of multimeter displays – analog and digital. Digital displays offer better accuracy and resolution, while analog displays are easier to read. Additionally, make sure the display is easy to read in all light conditions. Durability is another factor you should keep in mind before buying a multimeter. Since multimeters are often used in rugged conditions, it’s vital to choose a durable model that can withstand wear and tear. Look for features such as a sturdy casing, rubberized grips, and water resistance. In conclusion, the above-discussed factors should guide you when choosing the right multimeter. By evaluating the accuracy, resolution, safety features, display type, and durability, you can find a model that meets your specific needs and requirements.
Price Range Of Multimeters
A multimeter is a crucial measuring instrument that can help you diagnose faults and test electrical circuits. However, multimeters come in different price ranges, varying from budget, to mid-range, and high-end multimeters. The price and features of a multimeter depend on its design, functionality, and brand. Hence, choosing the right multimeter can be a daunting task, especially for beginners. Below is a breakdown of multimeters based on their price range and features.
Budget Multimeters
Budget multimeters are ideal for individuals looking for a basic multimeter to measure voltage, current, and resistance. Budget multimeters come with limited functionality and relatively low measurement accuracy compared to other high-end multimeters. However, they serve as great entry-level multimeters for beginner hobbyists and students. Here are some examples of budget multimeters and their prices:
| ANENG Digital Multimeter Tester | $15.99 |
| Gardner Bender Digital Multimeter | $23.63 |
| Mastech MS8236E Digital Multimeter | $29.99 |
Mid-range Multimeters
Mid-range multimeters offer more advanced features such as the capacity to measure temperature, capacitance, and frequency. They have a higher measurement accuracy due to their advanced circuitry, and they are suitable for use in professional settings. Mid-range multimeters may also come with auto-ranging and manual-ranging options to allow users to toggle the measurement range based on their preferences. Here are some examples and prices of mid-range multimeters:
- Klein Tools MM400 Digital Multimeter – $49.97
- Fluke 101 Basic Digital Multimeter – $47.99
- Etekcity Digital Multimeter – $56.99
High-end Multimeters
High-end multimeters come with advanced features, and they are designed for use in professional settings where high accuracy is critical. They are expensive due to their high-end features, highly accurate measurement capabilities, precision engineering, and construction. They are also built to last, and they can withstand heavy usage. Here are some examples and prices of high-end multimeters:
- Fluke 87V MAX True-RMS Digital Multimeter – $614.99
- Keysight U1282A Handheld Digital Multimeter – $750.99
- Email E48-9-G Digital Multimeter – $1,331.99
Choosing the right multimeter can be a challenging task due to their variation in price and features. However, understanding the different kinds of multimeters and their corresponding price ranges can help you narrow down your options.
Top Brands Of Multimeters
Explore the top brands of multimeters, the ultimate measuring instruments that can measure voltage, resistance, current, temperature, capacitance, and more. These devices are designed with digital or analog meters, resistors, and other circuitry, ensuring high accuracy and speed in measuring electrical quantities.
Some popular brands include Fluke, ANENG, and Gardner Bender.
Top Brands of Multimeters When it comes to buying a multimeter, you want to ensure that you are investing in a high-quality and reliable instrument that can accurately measure electrical properties. The market is saturated with various types of multimeters, but some stand out in terms of performance, durability, and functionality. In this section, we will explore the top brands of multimeters, including Fluke Corporation, ANENG, and Gardner Bender.
Fluke Corporation
Fluke Corporation is a renowned brand that specializes in the manufacturing of measurement instruments. Its multimeters are designed to meet the needs of both professionals and DIY enthusiasts. Fluke multimeters are known for their durability, accuracy, and versatility. They feature advanced technology that enables users to measure various electrical parameters with ease. Additionally, Fluke multimeters have user-friendly interfaces and are ergonomically designed for comfortable use. If you want a high-quality and reliable multimeter, Fluke Corporation is a perfect choice.
Aneng
ANENG is another brand that offers excellent multimeters at an affordable price. Its digital multimeters are perfect for people who desire a versatile and easy-to-use instrument that can measure several electrical properties. ANENG multimeters are accurate, durable, and have clear displays that make it easy to read measurements. They also come with various modes that allow users to switch between modes for different applications. You can trust ANENG multimeters to provide accurate measurements in any electrical situation.
Gardner Bender
Gardner Bender is a trusted brand that has been in the electrical and electronic industry for decades. Its digital multimeters are known for their superior performance, durability, and accuracy. Gardner Bender multimeters have robust construction and can withstand harsh electrical environments. They come with excellent features such as auto-ranging, data holding, and a backlit display for hassle-free use. With Gardner Bender multimeters, you are guaranteed accurate results every time you measure electrical properties. In conclusion, when it comes to buying a multimeter, it’s vital to invest in a high-quality and reliable instrument that can accurately measure electrical properties. Fluke Corporation, ANENG, and Gardner Bender are three of the top brands of multimeters that stand out in terms of performance, durability, and functionality. Choose any of these brands, and you will never regret your decision.
Credit: www.chegg.com
How To Maintain And Care For A Multimeter
Maintaining and caring for a multimeter is crucial to ensure the accuracy and longevity of the device. Regularly calibrate the multimeter, store it in a cool and dry place, and check the batteries frequently to avoid errors in measurements. It’s also important to clean the probes and keep them in good condition.
A multimeter is an essential tool for any electrician or DIY enthusiast to measure electronic properties. It is important to keep your multimeter well-maintained to ensure accurate readings. Here are three practical ways to maintain and care for your multimeter:
Cleaning The Multimeter
Cleaning your multimeter should be a routine practice to maintain its accuracy. You should use a soft bristle brush or a damp cloth to remove any debris or dust that may have accumulated on the device. You can also use a toothbrush to clean the small crevices on your multimeter. Additionally, make it a habit to check the probes before taking any readings to ensure that they are clean.
Calibrating The Multimeter
Calibration is the process of adjusting your device to ensure that it provides accurate measurements. A well-calibrated multimeter will provide you with readings that have a high degree of certainty. Calibration may vary depending on your multimeter’s brand, model, and use; it is recommended that you consult your multimeter’s manual for specific calibration instructions. It is advisable to calibrate your multimeter regularly or when you suspect that it is producing inaccurate readings.
Storing The Multimeter
Storing your multimeter correctly ensures its longevity and reduces the risk of damage. Always store your multimeter in a protective case or bag to protect it from dust, humidity, or scratches that may affect its accuracy. It is also essential to store your multimeter in a dry, cool place, away from direct sunlight and moisture. In conclusion, cleaning, calibrating, and storing your multimeter is crucial to extend its life and maintain its accuracy. These simple maintenance practices will ensure that your multimeter provides you with reliable measurements for years to come.
Frequently Asked Questions On Multimeter
What Does A Multimeter Do?
A multimeter is a device used to measure multiple electrical properties like voltage, resistance, and current. It usually features a digital or analog meter, batteries, resistors, and other circuitry to ensure the measurement of several electrical quantities with high accuracy and speed.
Additional features like temperature and capacitance measurement are also available in some models.
How Do You Use A Multimeter For Beginners?
A multimeter is used to measure voltage, resistance, and current in an electric circuit. To use it, set the dial to the desired parameter, connect the probes to the circuit, and read the measurement displayed on the meter. Always follow safety procedures and make sure the circuit is not energized before connecting the probes.
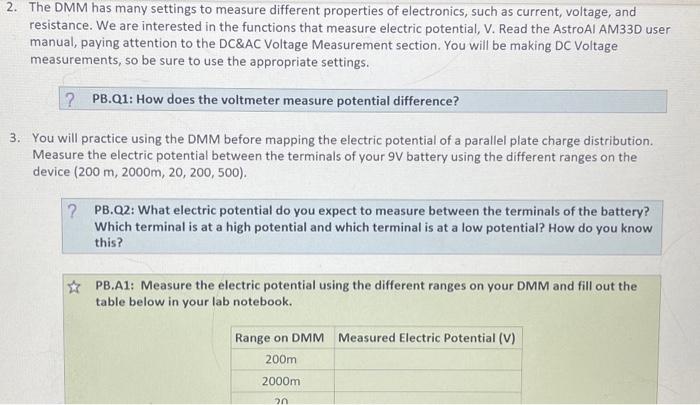
What Do I Set My Multimeter?
To use a multimeter, you need to set it to AC or DC voltage by turning the dial to the corresponding “V” symbol. Before taking any measurements, ensure that the multimeter is set correctly. The device allows you to measure the voltage, current, and resistance of an electrical circuit accurately and efficiently.
How Do You Check With A Multimeter?
To check with a multimeter, set the dial to the appropriate measurement mode such as voltage, resistance, or current. Place the test leads on the circuit to measure and read the result on the display. Always follow safety precautions when handling electrical equipment.
For detailed instructions, refer to the manufacturer’s manual or online tutorials.
Conclusion
A multimeter is an essential tool for anyone working with electronic devices or circuits. It allows you to measure different electrical properties with high accuracy and speed, including voltage, resistance, and current. Furthermore, with the availability of multimeters featuring the measurement of additional properties like temperature and capacitance, you can perform more complex tasks.
Understanding the design, components, and use of a multimeter will undoubtedly enhance your work efficiency and productivity in the field of electronics.